Elizabeth’s last “Behind the Scenes” post on our file nomenclature has a flip side: “Once you name them, how do you organize those scans on the server side?”

Two weeks ago I received what I’ve kiddingly called a “cease and desist” order from our IT department. At seven minutes before closing, I learned that our “projects” drive—where we’d been storing our scans from the Morton collection (among other collections)—was full. I knew this and had already started working on the problem earlier in the day. The friendly caller from the Library IT department was nicely adamant, however, in his insistence that before I left the office that evening I had to remove at least 10 gigabytes of data, and continue the process the next day. The Morton scans had already amounted to 140 gigabytes; respectable, but not immense . . . unless you do not have the room!
The Library’s long-term storage configuration, the Digital Archive, has lots of disk space, but that server is designed for little to no alteration of files, file names, or directory structures once files get deposited there. That’s with good reason: you don’t want to be accidentally renaming, deleting, or copying over files intended for long-term storage. Our short-term storage is the projects drive, a server meant to be used as an interim holding tank for scanning projects before transferring files to the Digital Archive.
Scanning as a processing tool represents the antithesis of the long-term storage model; “in process” scans are not necessarily ready for prime time because we don’t know what many of the images depict. By scanning negatives, for example, we get to see the images to aid in identification. We also have the possibility of matching up related negatives or slides that have been separated as their relationships are rediscovered. The resultant scans, however, can set on the server for a long time before any file name or directory manipulation might take place, and that runs contrary to the purpose of the project drive.
So scanning during processing fits neither storage model. Well, where (and how) are we going to put 140 GB of data? That’s not a huge amount on the face of it, but it is only going to keep growing, so we needed a file structure that would handle that growth, and one that the IT department could accommodate on the systems side, too.
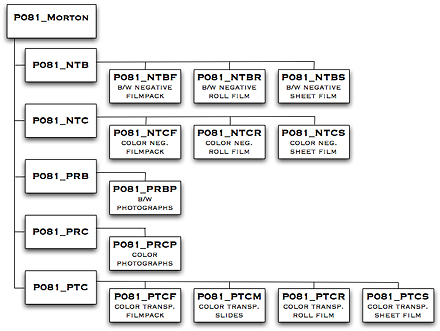
Here’s what emerged:

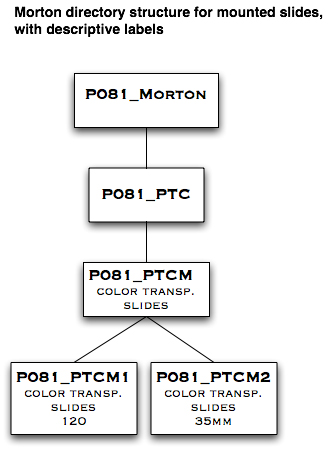
The diagram above shows the directory structure for the Morton scans. The top-level directory is P081_Morton, with five (for now) subdirectories: NTB (black-and-white negatives), NTC (color negatives), PRB (black-and-white photographs) , PRC (color photographs), and PTC (color transparencies, which are positives). Each subdirectory has a number of subdirectories that further refine the category, as do those subdirectories have additional subdirectories. The following diagram illustrates the file structure for color transparencies, showing the mounted slides at the base level:

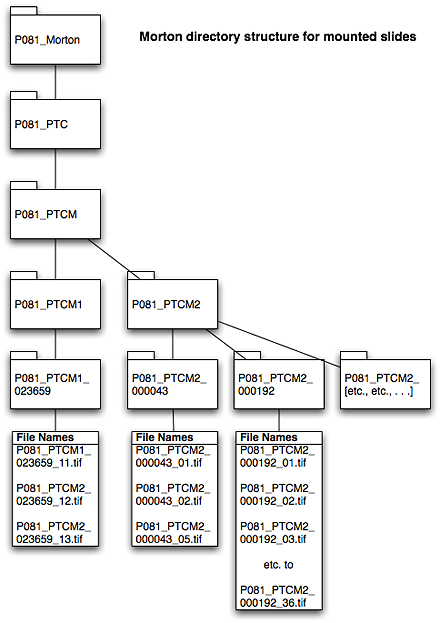
An illustration showing individual scans for 35mm slides, then, looks like this:

On the server side, we have re-conceptualized the notion of the Digital Archive. In the long run, we may end up with a third type of storage for longer term projects with sizable and flexible storage requirements that allow us to rename files, move them around into different directories, et cetera, and then formalize them before they are moved into more permanent storage. Until then, IT is unlocking the restrictions placed on the Digital Archive to accommodate our immediate needs. (And we are not the only ones scanning lots of material!) In the final scenario, the university’s Institutional Repository will be the ultimate long-term preservation storage solution, but that is a few years in the offing. For now, we’ll be using the approach above . . . and keep on scanning!

When we ran out of room, we’d just buy another external hard drive.
Wow! Impressive stuff, Stephen. I would never have guessed what it takes to catalog Hugh Morton’s photographs….but you guys are obviously taking the challenges one step at a time. I can’t help but wonder what our dear friend Hugh Morton would think of all this. I feel sure he too would be impressed and pleased at the job you and Elizabeth are doing.
This post, like so many of the others, brings to mind a Hugh Morton story
In the spring of 2004, I was preparing a TV documentary and realized I needed some photographic help. I called Hugh and explained the shots I needed. He said, “let me see what I can come up with.” A day or so later, when I went to the mail box, there was a big white envelope with the Grandfather Mountain Logo in the left corner. Hugh had “come up with” six perfect images. The note inside said, “if any other photos turn up, I’ll send them along.” A couple of days later, a second envelope arrived…two more perfect images had “turned up.” I don’t know what kind of filing system he used, but it worked beautifully..
I second the motion of buying external hard drive(s), but use two at a time for scan output: at intervals throughout the day using a task scheduler (Windows has a task scheduler, Unix/Linux has cron) backup the directories of one to the other. Ideally you would put these on two different USB interfaces on your machine to maximize throughput. You might be able to get a synchronization tool to work, avoiding moving files you already have as long as the timestamps are correct. The main point though, is to avoid hard drive failures: external drives arent’ necessarily the world’s best, that’s why they’re cheap.
At the end of the day, or beginning of the next day, I would swap for a different pair of ermpty drives, then move the data from the two “scan” drives to the server where they’d live and empty them for use on the next cycle. Depending on workflow, four or six drives might be sufficient.